Sunday, January 28, 2018

Pizza Problem

I have a pizza problem! I confess to wanting to eat pizza everyday.


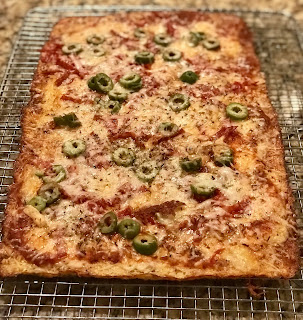
In an attempt to reduce my yeast intake, I had to come up with some sort of pizza fix. I decided to make a cauliflower pizza. This is a low carb, gluten free and (essentially) lactose free recipe but you could make other adjustments so that it was nut free and completely dairy free if you had other dietary needs.  
Not only was it successful, it was delicious! 


Ingredients: 

4 cups of riced cauliflower
1 tsp. Italian seasoning
¼ teaspoon of oregano
½ teaspoon of garlic powder
¼ teaspoon of salt
1/3 cup of grated Parmesan cheese (not the stuff in the green can but the real deal super hard stuff, that is naturally lactose free)
1/3 cup of grated lactose free mozzarella
2 tbsp. of Almond Flour
2 farm eggs

Pizza sauce and what ever pizza toppings you would like but I used Castelvetrano green olives, turkey peperoni and more cheese (1/3 cup parmesan & the rest of the 8oz block of lactose free mozzarella) 

Cooking directions:


Preheat oven to 450

Prep- Regardless if you rice raw cauliflower or if you buy frozen as I did, put 4 cups of cauliflower in a microwave safe bowl and microwave for 4 ½ minutes.
Toss the cooked cauliflower with ¼ teaspoon of salt and put it in cheese cloth – place the cheese cloth wrapped cauliflower in a fine collider with a heavy can on top of it to help press out the water. Let the cauliflower sit for 1 hour and then squeeze out all the water possibly.

1. Place cooked cauliflower in a large mixing bowl with all the listed dry ingredients, mix well and then incorporate the 2 beaten eggs

2. Using your hands form mixture into a ball and transfer it to a silicone-baking sheet (or parchment paper) lined metal baking sheet pan

3. Shape the cauliflower mixture into a pizza crust of your choosing. I recommend making 2 long rectangular pizzas (I made one- but I would do 2 next time because the crispy edges are the best)


4. Transfer to the oven and bake for approximately 15 minutes until the edges are a nice golden brown

5. Flip the pizza crust(s) over and bake for another 5 minutes

6. Pull out of the oven and top with a little layer of cheese and bake for 5 minutes 


7. Pull the crust from the oven and let it cool for about 5-10 minutes - Reduce the heat on the oven to 375

8. Top your pizza with a light layer of sauce and then whatever toppings you want (but do not overload the crust with toppings)

9. Bake your pizza for about 5-7 minutes until the cheese is melted and bubbly

10. EAT!

I found this pizza to be so tasty that I could eat it every night, but it was labor intensive and would not recommend it for a weekday meal when time is precious unless we can figure out how to make the crusts ahead of time and store them in the freezer. I’ll try that next time I make this low carb, gluten free, yeast free PIZZA!
Thursday, September 7, 2017

Summer Corn Chowder

For those of you that know me, know that me husband likes to bring home massive amounts of food; and not a bunch of different things that I could create simple meals with but a massive amount of one ingredient. So this past week he brought home a crate of corn, beautiful, sweet summer corn. But an entire crate. So after I gave some to the neighbors and a friend and we ate some off the grill, I still had a ton. So I decided I would make corn chowder, completely from scratch.

Here goes:

Ingredients: 
 
     6-7 ears of corn depending on size (I used 7 small/medium)- with cobs & milk reserved
   
    2 quarts of homemade chicken stock
   
    6 ounces diced bacon
 
    1 tsp. of fresh cracked pepper (this is an about, based on your affinity for pepper) 
   
    1 stick of butter
   
    1 large diced onion
   
    4-6 cloves of diced garlic
   
    1 seeded and micro diced Serrano pepper
   
    1 small yellow sweet pepper
   
    1 large russet potato
   
    1 pint of small redskin potatoes
   
    1 cup of half & half
   
    Sea Salt & Pepper to taste
   
    Chives for garnish


Prep- Remove the husk from the corn. Rub with a towel to help remove ALL the silk. Cut the kernels from the cob. It is helpful to cut the end off the cob so it is flat and this makes it safer to cut the kernels off, BUT I still wear a cut resistant glove. Use the back of the knife to scrap the cob and get as much of the corn milk as possible off the cob. Just put it with the corn. (This step might be unnecessary since we are going to boil the cobs anyway.)

 1. In a large-heavy soup pot, sauté the bacon until all the fat is rendered out and it is crispy bits. Remove the crispy bits from the pan and place on a paper towel to drain.

 2. With the bacon fat (approximately 3-4 tablespoons of fat- remove excess), sauté the onions for about 2 minutes & then add the yellow peppers. Sautee until the onions are clear and the peppers are wilted.

 3. Add the garlic, diced Serrano. Sautee for 1-2 minutes just until the garlic & hot peppers have started to give off a little of their oil.

 4. Add the 2 cups of chicken stock and the cobs to the pan. Let this boil on high for about 20 minutes. Remove the cobs and discard.

 5. Add the corn, corn milk, potatoes and pepper to the pot. Simmer until corn is tender- approx. 30 minutes *

 6. Reduce the heat to a low simmer.

 7. At this point some of the potatoes should have broken apart and be disintegrating into the soup. Use a hand held immersion blender to blend the soup to your desired consistence. I recommend leaving it pretty chunky but pulverizing it enough to make it creamy. Taste the soup before, during & after this process so you can add salt & more pepper to taste.

 8. Add the butter and when it is completely melted, remove the chowder from the heat and mix in the half & half.

 9. I recommend that you cool the soup down and store in your refrigerator for 24 hours to let the flavors come together.

 10. When you reheat your soup, remember to heat it slow and low. Don’t let it boil. Sprinkle with chives and crispy bacon bits to serve.

*(I added some water at some point in the simmering & boiling time but I'm not sure how much and I felt like mine was a little watery. So you might need to add a little water around step 5-6.)

 Hint- It is great with pulled chicken added in and heated up with it or top with a little white cheddar cheese for hardier options.